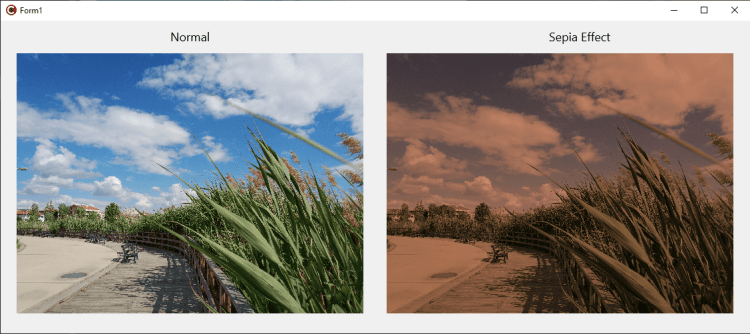
What is a sepia effect in a C++ app? Is there an easy way to add sepia effects to components? How can I add a sepia effect to alpha images in my applications? How can I use the TSepiaEffect component in C++ Builder? What are the visual tips to add a sepia effect in the development of C++ applications? Let’s answer these questions.
C++ Builder is the easiest and fastest C and C++ IDE for building simple or professional applications on the Windows, MacOS, iOS & Android operating systems. One of the greatest features of VCL and FMX UI frameworks are the effects on UI elements. There are many UI effects that can be used on most of the visual elements supported officially by the Embarcadero. There are many good effects that we can use: Sepia Effect, Reflection Effects, Shadow Effects, Emboss Effects, Glow Effects, etc. Let’s see how we can apply a sepia effect to our images in C++ Builder.
What is a Sepia Effect?
The sepia effect is a tonal editing technique that adds a warmer tone to a given image, so it appears to have a vintage or archival quality. Generally, Sepia effects have good results when used on photos. If you want to add some warmer style to your composition, the sepia effect works exceptionally well with black and white images. With C++ Builder, you can add a sepia effect to your color images by using TSepiaEffect. Let’s see how we can use TSepiaEffect.
How to use TSepiaEffect in C++ Builder?
TSepiaEffect is a class to create sepia effects for visible objects like images, shapes and similar items. TSepiaEffects affect the texture of visual objects. For further information, go to TImageFXEffect and FireMonkey Image Effects. Using these components, you can apply a sepia effect to screen elements and images with NO CODE at all!
The intensity of the sepia color applied over the texture can be set through the Amount property. The following table shows the result of the TSepiaEffect effect on a .png picture, placed on a form (using a TImage object). The default value (Amount=0.5) is used to set the sepia amount.
- Create a new Multi-Device C++ Builder Project, save all project files in a folder
- Drag a TImage component from Palette onto the Form,
- Load an Image by using its MultiResBitmap property
- Copy and paste this TImage (Image1), position the new one (Image2) to the left
- Now we have two same Images. Let’s add SepiaEffect to the right one.
- Drag TSepiaEffect from Palette to the new TImage (i.e.Image2). If you do this it will automatically add Sepia Effect on the new Image with the 0.5 amount which is the default.
- You can modify the Amount (0 to 1.0) of Sepia Effect from the Object Inspector if you want. Lower values add the lighter amount of sepia effect, higher values have much. The maximum is 1.0.

8. Finally, you can run the application by pressing F9 or Run button, Here is the result.

What are some additional tips on adding sepia effects to images at design or run time?
- You don’t need to use the sepia effect if it is not needed, the simple UI is the best!
- User images are a good candidate on which to apply the sepia effect, do not use on other components and visual elements if not necessary
- Lower values add a lighter amount of sepia tone, higher values have a much stronger effect. The maximum is 1.0.
- If you have a constant, non-changing static image that will have the same amount of sepia at runtime, I recommend you save this result as a new Image and use it. Note that sepia effects cost GPU usage due to distortion on all pixels of that UI element. Thus, it may mean more energy consumption which will impact mobile users and that may cause your app to be listed as a higher energy consuming app in user task managers and monitors. If you really overdo it Android and iOS users may even receive warnings about your app being a battery hog which can negatively impact their perception of an otherwise great app. So, the golden rule is – use the effect in moderation.
- You can use sliders or knobs to control the effect amount at runtime and you can do animation effects too.
As you see the sepia effect can be a great tool if you want users to modify their images (like photo editors, photo effectors) by adding a sepia option with no, or almost no coding required by you. You can let users set the amount (really, the strength) of the sepia effect. Note that you can also develop a custom pixel manipulator in C++ if you want to develop more professional sepia effects with more optional parameters.

C++ Builder is the easiest and fastest C and C++ IDE for building simple or professional applications on the Windows, MacOS, iOS & Android operating systems. It is also easy for beginners to learn with its wide range of samples, tutorials, help files, and LSP support for code. RAD Studio’s C++ Builder version comes with the award-winning VCL framework for high-performance native Windows apps and the powerful FireMonkey (FMX) framework for cross-platform UIs.
There is a free C++ Builder Community Edition for students, beginners, and startups; it can be downloaded from here. For professional developers, there are Professional, Architect, or Enterprise versions of C++ Builder and there is a trial version you can download from here.
Design. Code. Compile. Deploy.
Start Free Trial
Free C++Builder Community Edition

