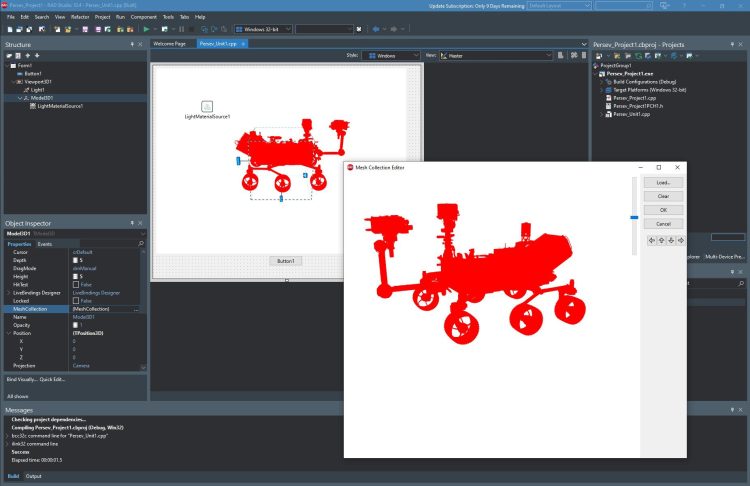
Do you want to develop your own Mars Simulation with the latest Mars Perseverance Rover 3D Model or Mars Ingenuity Helicopter 3D Model? C++ Builder is very easy to develop this kind of simple simulations. You just need a 3D object model and some colors, lights, a camera, maybe some textures. This same method and results can be obtained in Delphi too. Let’s see how it is easy to do a simulation.
- Create a new C++ Builder Multi-Device FMX Project, Save all Unit and Project files to a folder (i.e. PerseveranceSim)
- We will use Viewport3D to display our 3D environment (scene). Drag a TViewport3D onto your Form. Set UseDesign Camera property to false, because we will use our camera to view objects in this scene.
- Add TCamera from the 3D Scene group in Tools Palette, Set its Position->Z to -10
- We will use Model3D to display our 3D object. Drag TModel3D
- We need some lights, Drag TLight from the Tools Palette to the ViewPort3D. Set its LightType to Point and its Position->Y to -10 in the Object Inspector window.
- and we need MaterialSource to display it in colors, Add a LightMatrialSource from the Tools Palette
- Now let’s download Mars Perseverance Rover, 3D Model in *.GLB format from Official Nasa’s Perseverance Rover Lands on Mars Web Page. Here you can download both Mars Perseverance Rover and Mars Ingenuity Helicopter, 3D models.
- We can only load *.DAE, *.ASE or *.OBJ based 3D object format into our Model3D. So, we should convert this GLB to DAE. Go to free online GLB 3D object file format to DAE 3D object file format converter web page here. Drag the GLB model here to convert DAE. Submit and wait to be converted. This may take few minutes, then save it to your project folder.
- Now back to RADS, designer. Select Model3D1 and double click to its MeshCollection to load our 3D Model Object.
- Press the Load.. button to Load our converted Rover object in *.DAE format. This may take few minutes, wait till you see 3D Rover in Mesh Collection Editor.
- Press the OK button to apply this to our Model3D1. This may take few minutes, wait till you see a 3D rover in your Viewport.
- Set Depth, Height, Width of the Model3D to 5, so you can see better. You can set its Position and RotationAngles too.

10. Now we have Scene and 3D object. This 3D object has many parts and each part may have different Materials with Colors and Textures. Let’s simply set all parts Materials to same our Material. We can get number of parts of this Model as below,
|
1 2 3 |
int number_of_parts = Form1->Model3D1->MeshCollection.Length; |
We can set MaterialSource of i’th MeshCollection as below,
|
1 2 3 |
Form1->Model3D1->MeshCollection[i]->MaterialSource=LightMaterialSource1; |
So, to set all parts of materials in to the same material we can modify our codes as below.
|
1 2 3 4 5 6 7 8 9 10 11 12 13 14 15 16 17 18 19 20 21 22 23 24 25 26 27 |
//--------------------------------------------------------------------------- #include <fmx.h> #pragma hdrstop #include "Persev_Unit1.h" //--------------------------------------------------------------------------- #pragma package(smart_init) #pragma resource "*.fmx" TForm1 *Form1; //--------------------------------------------------------------------------- __fastcall TForm1::TForm1(TComponent* Owner) : TForm(Owner) { int number_of_parts = Form1->Model3D1->MeshCollection.Length; Form1->Model3D1->BeginUpdate(); for(int i=0; i<number_of_parts; i++) { Form1->Model3D1->MeshCollection[i]->MaterialSource=LightMaterialSource1; } Form1->Model3D1->EndUpdate(); Form1->Model3D1->Repaint(); } //--------------------------------------------------------------------------- |
11. Finally we can test our application in the Camera View with our Material Colors. Just Pres F9 or Run button.

From this point, you can add a ground surface with a Mars texture and, change color of Viewport to Dark, you can add keys to move this object. Add Ingenuity Helicopter 3D Model.

You can find number of parts by increasing part number and changing its material in every button click as below,
|
1 2 3 4 5 6 7 8 9 10 11 12 13 14 15 16 17 |
void __fastcall TForm1::Button1Click(TObject *Sender) { if(part<number_of_parts) { Form1->Model3D1->BeginUpdate(); Form1->Model3D1->MeshCollection[part]->MaterialSource=LightMaterialSource1; Form1->Model3D1->EndUpdate(); Form1->Model3D1->Repaint(); Label1->Text=IntToStr(part); part++; } } |
Using this method, we found that Part 27, 28 and 29 are parts of wheels, unfortunately in this model 6 wheels built as a one object, so you can not rotate each wheels. You should delete wheels of these model and you should add your wheels if you want to rotate each of them when moving. You can move these 3d objects by changing their Position and RotationAngle in X Y Z directions. For these please read more about 3D Objects in C++ Builder;
https://learncplusplus.org/learn-about-working-with-3d-in-modern-windows-c-development/
https://learncplusplus.org/learn-about-working-with-3d-windows-components-in-c-development/
https://learncplusplus.org/learn-to-quickly-create-specific-3d-objects-in-modern-c-applications-for-windows/
You can read GLB glTF formats and create you specific 3d, please check for this https://peted.azurewebsites.net/glb-reading-and-writing/
We hope you enjoy this simple example.


